Building a Watch: Part 1
I want to build myself a watch.
One of my goals this year is to learn more electronics, and the best way I’ve found to learn is often to have a project. For example, the heart box taught me a bunch about laser cutting and tolerances. I think a watch will be a good project because:
- I currently don’t have one, but I want one
- It has interesting size constraints (imposing limits is fun!)
- It’ll be battery powered
- Lots of room for improvements
Bonus: It looks like I will probably have to make a circuit board for this! I have 0 clue on how to go about doing that yet, but this should give me a pretty good excuse.
Feature Wish List
I want the watch to have normal watch functions like keeping the time, having alarms and preferrably a stopwatch / timer mode. It would also be really cool if I could make it silent, since beeping is pretty annoying. Instead, I think I should incorporate a vibration motor.
Eventually, I would like to have it connect to my phone / computer so it will need to have bluetooth at some point.
Finally, it needs to look good. That means, it can’t be a 20cm tall monstrosity covered in electrical tape.
Potential Parts
I’m not entirely sure which parts I will choose yet. I’ve been drawing heavily from The open source watch to see how such a thing can be made. They use a microduino core+ which is really cool and super tiny! I have the most experience with Arduino (and thus AVR) chips so I will probably stick with that, although now that I think about it, it might be cool to use a Propeller because it can multi-task. The other option is to use something like the Trinket Pro (since it has a nice battery board addon) but it may prove to be too big.
Next, I have to choose a display. After lots of googling I found the Sharp Memory Display which is a cool mix of e-ink and LCD. (fun fact: it’s the display in the pebble). I don’t care much about color, so I think I will go with it despite the memory restrictions it will impose on the build.
I don’t yet know what battery I will use, probably something from Adafruit. I’m trying to choose between a 150 mAh and a 500 mAh one.
I think I need an RTC module, but it’s possible that I can get away with keeping track of time without it, and just relying on paired phone to deliver accurate time.
Next Steps
I think I will order a bunch of parts to bread board this out. I need to test a bunch of things like power draw. Also probalby lots of yelling at my computer when I can’t figure out how to build a bread board.
HOMESTUCK or why fandoms are fun!

So recently I’ve been reading through a webcomic called Homestuck, which I totally recommend if and only if you have a lot of free time and enjoy silly computer jokes. Sadly it’s a bit tricky to get into. Also it’s stupendously long like “251% the size of the Lord of the Rings”
TIPS ON GETTING STARTED:
- Click on http://www.mspaintadventures.com/?s=6
- Ignore some of the weird bits like that the fact the website is called MS paint adventure. The author (andrew hussie) has a few other comics
- keep going
Part of the fun is the jokes/puns, but also the crazily complicated plot. Like, it’s sufficiently weird and wonky that I have to consult the extensively curated fan wiki on a fairly regular basis.
Dabbling with KERNEL HACKING

So I have this fascination with understanding how things work and it has had the unfourunate of becoming interested in THE LINUX KERNEL
I’ve seen some cool (and excited) posts from Julia Evans about the topic! It got me excited, but more importantly it made the topic seems significantly less scary and approachable. I’ve been trying to learn C for a while now because so much important computer code is written in it.
To that end, one of the blog posts linked above mentioned the EUDYPTULA CHALLENGE which sounds exciting! (side note: eudpytpula is a GENUS of penguins) The gist of the challenge is that you are presented with a series of tasks that teach you more and more about kernels.
I’ve completed task 1! I would share the code with you but I’ve taken a VOW OF SILENCE so that each new recruit can work through the tasks on their own. Instead I will share some of the useful kernel resources I’ve found so far.
- The Linux Kernel Module Programming Guide: Pretty good guide to kernel modules, although it is for a much older kernel. Maybe that will be an issue at one point?
- Linux Cross Reference pretty useful so far
The biggest challenge I’ve faced so far has been getting Thunderbird to send email in a format that’s comprehensible to the little script that is is the Eudpyptula. Turns out email is a crufty old protocol.
Soon, I shall be MASTER OF THE LINUX KERNEL (I hope)
Migrating to jekyll for blog style outpourings
Recently, my (previous) blog hosting platform decided to axe their free tier and the price they were asking was too much for me. Plus, I’d be thinking for a long time about how it would be nice to do the hosting by myself. In addition to cutting my dependence on an external service, I’d get to learning more about ops-y things in the process.
My first attempt at this migration was with Octopress, which I’d dabled with a bit in the past. I quickly abandoned it though because it felt much too complicated. The default theme was split too many times, there were weird and (to me) unneeded layers of complexity.
Instead, I chose to use the platform Octopress is based on: Jekyll. It produces a nice clean site of interlinked and static HTML pages (which should be easy to host). It consumes posts or pages in either markdown or html, so I can write a post however I want. It has a simple template system and a theme that fits in my head so I can make it look like how I want without throwing something at the wall.
Important the old content was a bit tricky, but there’s a nice plugin someone wrote to import an rss feed into jekyll that you can find here. Just run jekyll import rss --source http://blog.domain
The only challenge I had was importing the images from the old site. I ended up writing a little script to grab a list of all the images, download them and then replace the src with a local reference. Here’s the source for that
require 'nokogiri'
require 'net/http'
require 'pry'

Dir.glob("octopress/source/_posts/*.html").each do |file_name|
  file = File.open(file_name, 'r+')
  post = file.read
  a,b,c = post.split("---")
  doc = Nokogiri::HTML::fragment(c)

  doc.css('img').each do |elm|
    img_elm = elm['src']
    uri = URI(img_elm)
    filename = "temp/" + File.basename(uri.to_s)
    if File.exists?(filename)
      puts "skipping " + filename
    else
      File.open(filename, 'wb') do |image|
        puts "downloading " + img_elm
        image.write(Net::HTTP.get(uri))
        sleep(2)
      end
    end

    elm['src'] = "../images/" + File.basename(uri.to_s)
  end
  file.rewind
  file.truncate(0)
  file.truncate(0)
  file.write([a,b,doc.to_html].join("---"))
  file.close
end
What’s cool is that code up there is hosted on my site! I had been using gists before, but that’s just one more thing that was outside of my control.
I considered a few alternatives. Wordpress is kind of the standard for this sort of thing, but it feels like there’s a 0day every other week for it and I’m bad at patching. Plus I need a server capable of running a LAMP stack, whereas with something static (like this) I could host it on a 128 MB VPS that costs 15$ a year. Wait, that’s what I’m doing. Ghost looked interesting, but I don’t know much about node or hosting a node site. I even thought about rolling my own, but I tried that with blag and it didn’t turn out quite the way I was hoping.
I will miss being able to write and publish a post anywhere I have an evernote account, but I think jekyll is good enough for now.
(ps do the comments work?)
Making a clock
Approximately 2 years ago I ordered an RTC clock module from Sparkfun with the intention of building a clock of some kind.
FINALLY, I've gotten around to hooking everything up! Here's a picture of my amazing setup (if you wiring things for a living, please don't kill me)
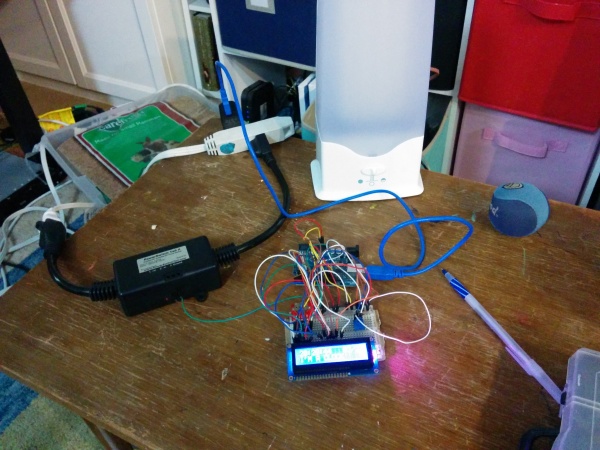
The goal is to help my wake up in the morning by turning on a SAD lamp. If you've ever seen one of these faux sunlight lamps before you will wonder why I'm doing this. If you have seen one of these, you'll understand because these things are REALLY FREAKING BRIGHT.
PARTS
Here's the part list
- Arduino Uno
- DeadOn RTC
- Coin cell battery
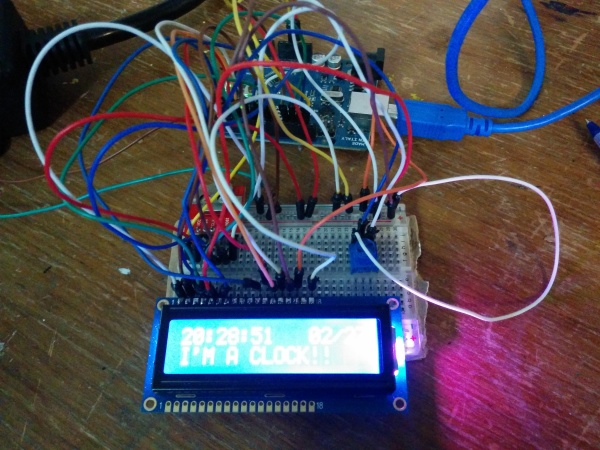
- RGB LCD 16x2
- Powerswitch Tail
Getting all these parts together was actually surprisingly difficult. I ordered the RTC, but I didn't order a battery since I thought I could find one locally. I was wrong, so I ordered one online. Don't do that unless you have lots of time to wait. It took like 2 months to ship that tiny coin cell battery across the border to me here in Canada since it has lithium in it.
The RGB LCD was actually part of a kit from Adafruit which is all supposed to be controllable over I2C. I assembled almost all of the kit successfully, but the last piece I put on backwards. And of course, it was the 40pin chip which has proven to be resistant to my efforts to desolder it. sigh. Thankfully I was able to salvage the LCD part.
ASSEMBLY
So the first thing I tried to do was get the the RTC module working. This proved to be quite frustrating. I wired everything up, but I was getting garbage data back from the module. It was counting up (sorta), but random extra bits were getting set and unset. So it would go 0:0:59, 0:1:0, 1:1:1, 0:1:2. WTF. Eventually it turned out that the problem was the way I was grounding the module. I'm not entirely sure what was happening, but eventually I got the right wire connected to the ground on the arduino, bypassing the breadboard.
Everything else was relatively easy to set up. Adafruit has an excellent guide on their LCD Shield. The powerswitch tail is controlled by setting a single pin high or low.
CODE
Here's the whole thing below. Most of the code for interacting over SPI to the RTC module is from Sparkfun.
I had some fun messing around with sprinf (it's like printf, but it fills a char array!) You can set the alarm time by modifying the values in the Alarm int array.
BUGS
For some reason there are 2 garbage characters left on the LCD after the end of my screen. I "fixed" this by just appending more space characters than will fit in a 16 char line.
FUTURE WORK
It would be nice to have multiple alarm
subscribe via RSS